Pages

Details. . .

My photo
Reminding myself daily to bloom where I'm planted.

Sunday, November 29, 2015

Black Felt Sugar Skull Ornaments

I picked up some felt squares
at JoAnn's last week.

The Black Friday shoppers had already
cleaned out several colors and it was
only Tuesday!

I wanted to pick up some white or cream for a
base as well as the black, but they were out of stock
at my store that day. 

I do like black with the bright colors
and am happy with the way they turned out.


I started by drawing a pattern on grid paper
and then cutting out the design on cardboard. 

I had a piece laying around that happened to be red. 
As you can see I need a new blade for my razor knife. 
(The right tools make all the difference!)

 I cut enough cardboard templates 
for each ornament, because they were glued inside.


I cut the felt about 1/4" larger than my template
so I could finish the skull off with a blanket stitch. 


I used DMC floss, buttons, beads,
and rhinestones for embellishments. 

They're a lot of fun to make.

I'm still working on several more. The options for
designs are endless!


Friday, November 27, 2015

Love Shrine

This is how my "Love Shrine" started out.

The base is an old Lang Christmas card box.

(Whenever I come across a good strong box, 
I always tuck it away for a future project.)

I designed a fancy asymmetrical frame to go around it, built it
up with some air dry paper clay and cardboard 
designs, and then paper mached the whole thing. 


 Once it thoroughly dried (about 2 days),
I primed it with Zinzer Bullseye 123.

I used assorted acrylic and dimensional paints to create
a primitive design, which I sealed with a gloss medium. 

It's embellished with some cold porcelain clay roses
and rhinestones. 


It's rustic, simple, bright and cheery.


I may need to add some glitter modge podge
to the frame to give it even more pizazz. 

Either way, I "LOVE" it!


Wednesday, November 25, 2015

Sugar Skull Egg Ornaments

I came across these eggs while digging through
my craft supply box. 

They were a half off "after
the holiday" purchase from Walmart. 

I wish I'd picked up
several dozen. I'm hoping they
carry them again this coming Easter. 

They are so much fun to work with!


I decided to make a sugar skull ornaments with the eggs and 
used my very fine artist markers for the design. 

I finished it off with lace, a flower bead, and beaded straight pin.

Black ribbon was used for the hanging loop and I glued 
all those things together with Tacky Glue. 


The back had to say Feliz Navidad!


After making a "her" I had to make a "him".

I started by making a black hat with a purple rose
and green leaves out of cold porcelain clay and let 
that dry for 24 hours. 

In the meantime, I worked on his face
and back "Feliz Navidad" greeting. 


The hat and ribbon were adhered
with a black beaded straight pin
and Tacky Glue. 


I love the way they turned out and am
anxious to show you some more that I've just finished.

I learned from the first ornament, not to use my artist markers.
While they're great for drawing on paper,
they smeared a bit as I turned the egg in my
hand to work on it. 

With my subsequent ornaments, I used permanent markers
(Bic and Sharpie) as well as Pitt Pens.
They all worked well together and didn't smear. 

Happy Thanksgiving.

I hope you have a wonderful holiday!

Monday, November 23, 2015

Star and Cross Shrine

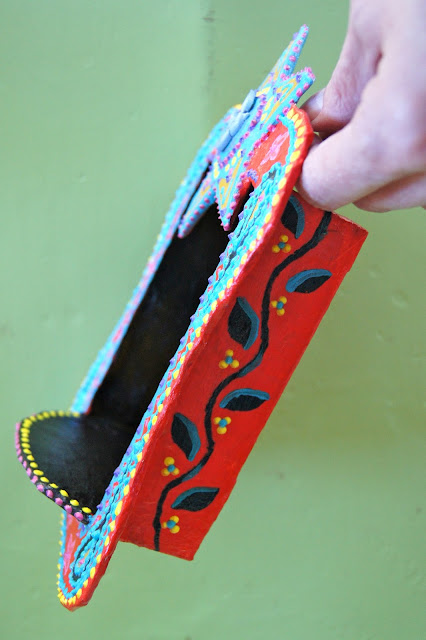
This is the completed star and cross shrine
that I mentioned in my last post. I say completed,
but I'm still pondering adding something
to the bottom right (inside) corner to hide some
bubbling that occurred in that area. 

I still need to figure out how
to hang my shrines.

There's not a lot of weight to the piece, but
any hanger will need to be adhered with 
glue of some kind. I want something that'll
be sturdy and long lasting, but won't damage the piece. 

I'll have to see what Home Depot has available. 


Up next is a side view of the piece. 
I had to make that pretty too.

You can get more of an idea of
it's size next to my hand in this pic. 


On Wednesday, I plan to share some funky
Christmas ornaments that I'm working on.

Hope your day is a good one!

Thursday, November 19, 2015

Cardboard Shrine Boxes

There were a couple of factors that tipped the scales
when it came to making my own shrine boxes as 
opposed to purchasing ready made ones. 

First and foremost, I wanted to design my own
patterns and create one of a kind pieces. Mind you, 
I looked at a bunch of different designs and
then started sketching out 
some patterns of my own on grid paper. 

The second reason goes back to
my desire to use the materials I have on hand.  

The bases are all sturdy Christmas card boxes. The
frames and details are cut from various cardboard mailing boxes
I'd saved. 

All of the pieces of these boxes
were adhered together with masking tape, no glue. 


Sorry about the fuzziness of the bottom box in this next picture,
but I wanted to point out how I used
some air dry paper clay as well as cardboard 
cut-outs to build up some dimension. 


I learned a few tips with this project. 

1) The more intricate the design, the more patience and time
you'll need to paper mache. I did several pieces at a time and it
would've been better to focus on one to completion. 

2) Also, the more detailed the design, the smaller the strips
of paper you'll need to fit in the little spaces. I thought maybe if
the paper was saturated enough, I could coax it into the crevices
and around corners. . .wrong! It didn't work and I had to undo and redo.

3) I would've been a bit more generous with the masking tape, especially
around the edges of the frame. One of the frames became
a little too pliable while sitting to dry. Gravity wanted to pull down
some of the scroll type edging that had become too saturated
during the paper mache process. I was able to straighten it, but more
tape may've prevented the problem in the first place. 

The following is my star shrine. I'll 
post pictures of this piece all finished in my next post. 


Tuesday, November 17, 2015

Bird and Bear Nicho

The base of this nicho is an empty crab meat can.  
It's a little deeper than a tuna can.
I washed it well and made sure to get rid of any odor. 


My next step was to draw and cut out a cardboard frame 
to fit the opening of the can.

I taped the frame to the can with masking tape. 
 Using my homemade air dry paper clay, 
I built up some dimension and ridges
on the frame and paper mached the whole thing. 

It took a full 24 hours to dry before
I coated the whole thing with Zinzer 123 Primer. 


The following picture is the completed piece.
I used an old greeting card for the background and some reindeer moss
for the inside surrounding edge.

The roses were made from my cold porcelain clay.
I used acrylic paints and dimensional fabric paints (which 
may be used on surfaces other than fabric). 

I coated the outside with Liquitex Gloss Heavy Gel Medium. 


Because of the depth and the visibility of the outside
of the can, it needed some embellishing as well. 


I haven't finished the back yet because I have to figure out
how and if I want to hang it.

It sits nicely on a flat surface, but I think it'd be cute hanging as well. 

Once I figure that out, I'll add a meaningful quote and my signature 
to the back and give it a quick coat of the gloss medium. 


Friday, November 13, 2015

Fabric Basket

Here's a fun and fast project that 
takes just half a day to make.

If you like to sew, you probably have all the 
materials on hand. 

~Material
~Fusible batting
~Four Buttons
~Square Template or Ruler


The little unfinished basket in the following 
picture belongs to a friend of mine.
She brought it with her to our last coffee date and let me take it home
to study and make one for myself. 

I used a 15" square template and hers was probably a 10" square. 

After I finished this project I went on Pinterest and typed "fabric baskets" in the search bar. 
Plenty of pins like this came up with DIY's you may link to  
if you're interested in making one for yourself. 

I look forward to making more of these.
I think they'd make great little gifts!

Questions are welcome.
Happy Sewing!


Thursday, November 5, 2015

Te Amo Niche Shrine


This project was an experiment
with a variety of mediums.

Paper Mache
Cold Porcelain Clay
Air Dry Paper Clay
Niche Design and Creation

Nothing was purchased for this project. 
Lately I've been trying to create things
 from materials I have on hand. 

I've always loved niche/shrine/diorama art pieces and
decided to give one a try myself. 

This one took me about 4 to 5 days to complete.

I ruined a perfectly good sauce pan cooking the cold porcelain
clay, because I mixed it in the pot instead of a separate
bowl first and then I cooked it too long. 

It made me a little sad throwing that pot away
that I've had for 28 years! Next time
I'm buying a cheap pot from the thrift store and using that. 
That's what I get for being a rebel and not paying 
attention to the suggestions on the youtube videos I watched. 

I found the easiest way to color the cold porcelain 
clay is with markers. Just poke them into the clay and knead away.
Sharpies are fine and won't permanently stain your hands. 


The flowers, leaves, candles, and pink hearts are
all made from the cold porcelain clay.

The big red heart at the top and the center cross are
made from the paper clay. 

I used acrylic paints as well as dimensional fabric paint 
and sharpie markers on the design.

I'm pretty pleased with the way it turned out and have started
a couple more. 

Let me know if you have any questions. 

Happy creating.
Terri